The Lego Minstroms and CyberMaster robots are wonderful new toys from wich a wide variaty of robots can be contructed, that can programed to do all sorts of complicated tasks. Unfortunately, the software that comes with the robots is , although visually attractive, rather limited in functionality. Hence, it can only be used for simple tasks.
To unleash the full power of robots, you need a different programmming environment. NQC is prograamming language written by Dave Baum, that was especially designed for the Lego robots. For complete report can look at here.
Showing posts with label software. Show all posts
Showing posts with label software. Show all posts
December 23, 2009
December 10, 2009
Amateur Radio Antenna Designing Software Use MMANA part 2
Step By Simple Antenna Analysis
During the install, MMANA has prepared many examples of antenna that can be used without need to make a new antenna examples. Various examples can be accessed via the menu MMANA File -> Open, in which there will be some folders containing the antenna examples, such as,
Aperiodic - like Rhombic.
Feeders - feeder antenna.
HF Beam - beam antennas in HF.
HF multiband - multiband antennas in HF.
HF Simple - a simple antenna on HF.
Match - for impedance matching.
Receive - to receiver / radio receiver.
Short - short antenna.
VHF - VHF and UHF antennas.
VHF Beam - antenna beam / yagi in the VHF / UHF. And many more.
If we do not need to tune the antenna to another frequency, then the actual simulation process is very simple.
Several stages / steps that need to be simple to analyze an antenna is as follows,
- Load the file in the desired antenna, through MMANA menu File -> Open -> Folders desired -> Files are in want.
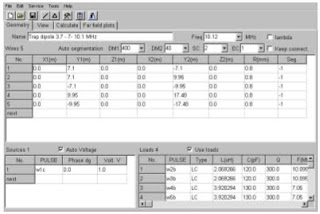
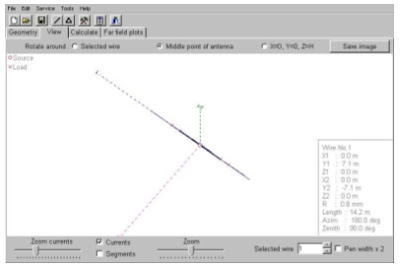
 After the files antenna that we want in the select and the load to MMANA, you will be showing dimensions / geometry of the antenna to be simulated, along with various other information, such as source and load position (coil) of the pairs of antennas.


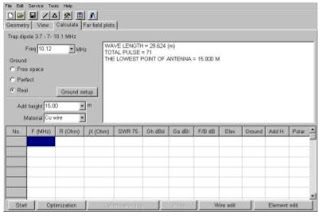
- Click the Calculate menu to prepare to simulate antenna. There are some things we can change in the Calculate menu, namely, operating frequency antenna, tower height, and type antenna material (whether it is a wire or pipe, copper or aluminum). Changes can do it now before doing calculations. Be careful in changing frekeunsi Your antenna may be un-tuned. Should perform optimization (Optimization) if you just change the operating frequency.

- Press the start button in the Calculate menu to simulate the antenna, the information will be in out among others is the SWR, gain, beam elevation angle.
 The next step is often done is to look at performance (SWR, forward gain and pattern antenna radiation) in a certain frequency range. This is done using the menu Plot which is at the bottom of the Calculate menu. We usually need to press the button "Detailed" to get all the calculations at various frequencies.


- We then can see the impedance (Z) vs. frequency

- SWR vs Frequency

 Note that the lowest SWR 1:1.1 near good enough for an antenna. We also see clearly, the frequency region where the antenna is still in resonance.


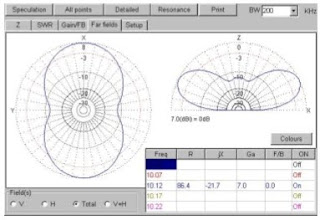
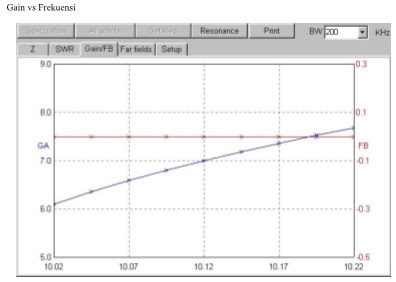
- Gain vs. Frequency Radiation pattern vs. Frequency
 If we are quite satisfied with the results of the simulation, usually we want to know the dimensions / geometry antenna. This can be done by pressing the View menu, there is cable dimensions in right side. To find out the various dimensions of the existing cable we need to use Wire Selected menu in the lower right.


December 09, 2009
Amateur Radio Antenna Designing Software Use MMANA
MMANA is software to simulate antenna made by JE3HHT - Makoto Mori, DL1PBD - Alex Schewelew & DL2KQ - Igor Gontcharenko.
Using software MMANA we can calculate exactly how the size antenna should we get up for work at certain frequencies and a good match. I itself had several times to implement the results of calculations and all MMANA average obtain good results. MMANA software can be taken for free on the Internet from the address,
http://mmhamsoft.amateur-radio.ca/files/programs/MMANA-GAL-1.2.0.20.exe
Installing on a Windows PC is relatively simple, like installing other software, we just need to click on file ,

And file exe from MMANA will automatically installed on the PC that we use.
December 04, 2009
Text Editor for Writing Assembly Programs
Text editor is a simple word processing program used to write programs for the microcontroller. Advanced word processing course is not necessary, because it takes only ascii text-only processing.
Some programs under the Windows environment can be used such as Notepad or Wordpad (save as text document). Some of the text editor under DOS is also still usable, even more easily. The author likes Q-Edit to write programs microcontroller.
Microchip as microcontroller maker PIC16x84 provide special programs other than MPLAB which serves as a text editor as well as a compiler for the microcontroller (using MPASM) and also as progammer (for programmers such as microchips made PICSTART, PROMATE etc.)
Whatever text editor you use, one thing to remember is to give the name of the program with extension.asm. This allows us that the file is an assembler file. Basically giving the other extension also not be blamed.
Programming PIC Microcontroller with MPASM
MPASM is Microchip-made program that is used to compile the program we have created for PICmicro.After compiled microcontroller family, which has created the program will be transformed into specific codes (binary / hex) is only known by its the microcontroller .
Therefore, files generated by MPASM will with extension.hex. The following is an example of a hex file.
: 0A00000083168501831205140428FD
: 00000001FF
We do not understand the meaning of these numbers, but the microcontroller PIC16x84 will understand. After you compile your program and have made a file. Hex it is now time to put the program into the microcontroller and view performance microcontroller.
MPASM program is a compilation of the program not only for the microcontroller PIC16x84 course, but for PICmicro microcontroller families. This program is working in the Windows environment and there are unisex which DOS environment work in version 5.0 and above.
MPASM program can be used in 2 ways:
a.For produce absolute code (absolute code) that can be executed directly by the microcontroller.
b.For generate object code (object code) that can be compiled dilinked with other modules.
Source files used as input to the MPASM has a specific format. This format must be followed to prevent errors during assembly processes carried out. If there are errors in the source files, then during the assembly process will produce an error message if an error occurs, it will produce an error file (*. err) which can be read by a text editor program. Source files can be created by following the rules as follows.
Each line in the source file can contain four types of information are:
a.Label
A label must begin in the first column. This label can be followed by a colon (:), spaces, tabs, or the end of the line. Labels must begin by a letter or underscore and may contain letters, underscores or sign Tanya. Labels can use up to 32 characters in length.
b.Mnemonic
A mnemonic assembly instruction, assembler directive, calling the macro must begin in the second column or more. If there are labels on the same line, the command must be separated from that label by a colon or by one or more spaces or tabs. One or more spaces must be used to separate labels and also between the mnemonic mnemonic and Operands.
c.Operand
Operands follow the mnemonic. Operands must be separated from the mnemonic by one or more spaces or tabs. After the dot-coma by MPASM will be considered as comments and will be ignored by MPASM.
d.Comments
Comments can be included following the Operands, mnemonic or label and can begin in any column. Maximum width of the column is 255 characters.
To start using MPASM is very easy. Once you activate this program will look like in the Figure 1 will be obtained.
 Figure 1.MPASM program source input display
You can just enter the file will be compiled through the BROWSE button. After that live press the Assemble. If the source file does not contain errors, it will be shown in green as figure 3 below
 Figure 2. the result file compilation OK
 Figure 3. compilation OK report
, but if produced error will be shown in red. To find out what mistakes we have done can be seen in the *. err file that is automatically generated.
 Figure 4. the result file compilation NG
 Figure 5. compilation NG report
 Figure 6. the error message file
Note the error messages in the file *, err. Then fix the error, and compile with MPASM. If all error messages have been corrected, then the *. err file will not be produced again.
Subscribe to:
Posts (Atom)

